What Is The DOM
The DOM is how the browser understands and manages your page. It’s the structure that connects HTML, CSS, and JavaScript. This guide walks through how it’s built, how events move through it, and how you can work with it safely and efficiently.
Tue Nov 04 2025 • 22 min read
When you open a web page, the browser does far more than display text and images. It builds a living structure — a model of everything on the screen that your code can read, change, and react to. That structure is called the Document Object Model, or DOM.
In this guide, we’ll walk through how the DOM is built, how elements connect, how events move through it, and how the browser updates what you see.
By the end, you’ll understand what really happens when you click a button, edit text, or call document.querySelector(), the everyday mechanics behind the modern web.
What the DOM Actually Is
When you open a web page, your browser doesn’t just show the HTML text—it builds a live structure in memory that represents everything on the page. That structure is called the Document Object Model, or DOM.
Think of the DOM as a map of your page. Every tag becomes a small object the browser can access, read, or change. Together, those objects form a tree that matches the nesting of your HTML: the <html> element at the top, then <head> and <body>, and so on down to the smallest <span> or text node.
What makes the DOM powerful is that it’s not just a snapshot. It’s alive. If a script adds a paragraph, removes an image, or changes a button’s color, the DOM updates immediately. The browser’s rendering engine then re-paints the page to match that new structure.
Here’s a small example:
<body>
    <h1>Hello</h1>
</body>
In your code editor, that’s static HTML. But once loaded in the browser, it becomes a tree of objects:
document
 └─ html
     └─ body
         └─ h1 → "Hello"
JavaScript can access and modify any part of this structure:
const heading = document.querySelector('h1');
heading.textContent = 'Hello DOM';
Now the text on the page changes instantly — no reload needed.
The key idea: the DOM is the interface between your code and what the user sees. HTML describes what should exist, CSS defines how it looks, and JavaScript uses the DOM to read and modify it in real time.
How the Browser Builds the DOM
Before JavaScript can manipulate anything, the browser has to build the DOM. That process starts the moment it begins reading your HTML file.
The browser doesn’t wait until the entire document has loaded. It parses HTML line by line, token by token, turning tags into nodes and connecting them in a tree structure. This happens in stages:
- Tokenizing – The HTML is broken into tokens: opening tags, attributes, text, and closing tags.
- Parsing – Each token becomes a node (like
ElementorText) with parent–child relationships. - Tree Construction – The parser builds a nested structure that mirrors the page hierarchy.
For example:
<html>
    <body>
        <p>Hello</p>
    </body>
</html>
During parsing, the browser reads <html> → opens a root node, reads <body> → adds a child, then <p> → adds a nested child, and finally the text Hello → adds a text node.
The result in memory looks like this:
document
 └─ html
     └─ body
         └─ p → "Hello"
When parsing encounters a <script> tag, the behavior changes slightly. Depending on its attributes, the script may pause DOM construction until it runs. That’s why you often see scripts placed at the end of <body> — to let the DOM finish building first.
Modern browsers optimize this with the defer and async attributes:
deferscripts wait until the DOM is fully parsed before executing.asyncscripts run as soon as they’re downloaded, independent of DOM parsing.
Once the browser has a complete DOM, it pairs it with the CSSOM (the parsed styles) to create the Render Tree — the structure the engine uses to calculate layout and paint pixels to the screen.
The DOM you can inspect in DevTools is this live, evolving structure — constantly updated as elements are added, removed, or restyled. It’s what your JavaScript interacts with in real time.
The Objects Behind Every Page
Before diving deeper into elements, it helps to understand where the DOM lives. Every web page runs inside a single environment called the window — one per browser tab.
Inside that window, the document object represents the current page. It’s the root of the DOM tree — the starting point for finding, creating, or modifying elements. When you call document.querySelector() or document.createElement(), you’re talking to this object.
The DOM elements themselves are structured under document, but they also inherit methods and properties exposed by the window. That’s why you can call alert(), setTimeout(), or access document directly — these are all part of the global browser context.
You can think of it as a simple hierarchy:
window → document → elementswindowrepresents the tab — it’s the global scope for scripts.documentis the page inside that tab.- Elements are the building blocks of the document.
Every element in the DOM is a JavaScript object that belongs to one of the HTML element classes. For example, <button> becomes an HTMLButtonElement, and <input> becomes an HTMLInputElement. Each one inherits from the base HTMLElement, which defines shared properties like id, classList, style, and event methods like addEventListener().
In short: the DOM isn’t just text; it’s a network of objects that your code can inspect and manipulate. Understanding how these objects connect — from window down to individual nodes — is the first step to understanding how every part of a page responds when something happens.
Nodes, Elements, and the Page Structure
Now that you know where the DOM lives, let’s look at what it’s made of.
Everything inside the DOM is a Node. Nodes are the fundamental units of the document tree — they represent elements, text, comments, and even invisible fragments used for building content.
There are several types of nodes:
| Node Type | Example | Description |
|---|---|---|
Document | document | The root of the DOM tree. |
Element | <div>, <p> | Represents an HTML tag. |
Text | Hello world | A text value inside an element. |
Comment | <!-- note --> | Developer comments in HTML. |
DocumentFragment | temporary containers | Used when inserting multiple elements efficiently. |
Each of these types inherits from the base Node interface, which provides shared properties like parentNode, childNodes, and nodeType.
The inheritance chain looks like this:
Node
 ├─ Element
 │   └─ HTMLElement
 │       ├─ HTMLDivElement
 │       ├─ HTMLParagraphElement
 │       └─ HTMLButtonElement
 └─ Text
This means all elements share core node methods (like appendChild()), but also have specialized behavior depending on their tag. For example, an <input> node supports .value, while a <video> node supports .play().
You can inspect these relationships directly in the console:
const el = document.querySelector('button');
console.log(el instanceof HTMLElement); // true
console.log(el instanceof Node); // true
Every node in the tree knows where it stands — it can access its parent, siblings, or children. This structure is what lets you move through the page logically:
const paragraph = document.querySelector('p');
console.log(paragraph.parentNode); // body
console.log(paragraph.firstChild); // text node inside the paragraph
Understanding this hierarchy is key. When you manipulate an element in JavaScript, you’re not changing the raw HTML — you’re updating these node objects, and the browser reflects those changes visually.
Finding and Moving Around the DOM
Once you understand the DOM tree, the next step is learning how to navigate it — finding the elements you care about and moving between them.
Selecting elements
The most common entry point is through the document:
const heading = document.getElementById('main-title');
const links = document.getElementsByTagName('a');
const buttons = document.getElementsByClassName('cta');
These methods return live collections, meaning if elements are added or removed, the list updates automatically.
Modern code typically uses querySelector() and querySelectorAll(), which accept CSS selectors:
const firstButton = document.querySelector('button');
const allButtons = document.querySelectorAll('button.primary');
These return static results — snapshots of the DOM at the time of the query. They’re flexible and predictable, which is why most modern JavaScript prefers them.
Traversing relationships
Once you have a reference to an element, you can explore its relatives.
Here’s a realistic example:
<ul id="menu">
    <li>Home</li>
    <li class="active">About</li>     <!-- we'll select this one -->
    <li>Contact</li>
</ul>
const item = document.querySelector('.active'); // the middle <li>
item.parentNode; // <ul id="menu">
item.previousElementSibling; // <li>Home</li> (or null if first)
item.nextElementSibling; // <li>Contact</li> (or null if last)
item.firstElementChild; // first nested element inside this <li> (or null)
item.lastElementChild; // last nested element inside this <li> (or null)
item.children; // HTMLCollection of all direct child elementsEach node knows where it lives in the tree — its parent, children, and neighbors.
There are also shortcuts for specific purposes:
firstElementChildandlastElementChildto move inside an element.closest(selector)to find the nearest ancestor matching a rule.matches(selector)to check if an element fits a selector.
Putting it together
Navigation and selection are the foundation for every DOM task. Whether you’re building a dropdown, validating a form, or animating a button, the process usually starts with finding elements, then modifying or listening to them.
In the next section, we’ll look at how to make those changes — creating and updating elements in the DOM tree.
Making Changes to the Page
Now that you can find elements, the next step is to change them.
Creating new elements
You can create elements entirely in JavaScript using document.createElement():
const newDiv = document.createElement('div');
newDiv.textContent = 'Created by JS';
Once created, you can add it to the page with append() or appendChild():
document.body.append(newDiv);At that moment, the DOM tree — and therefore the page — updates. You’ve inserted a new node into the structure.
Inserting at specific positions
Sometimes you need more control over where new elements go. For that, use:
prepend()– adds as the first childappend()– adds as the last childbefore()/after()– inserts relative to an existing element
Example:
const item = document.querySelector('ul li');
const newItem = document.createElement('li');
newItem.textContent = 'Inserted item';

item.after(newItem);
Updating content
Every element exposes properties for text and HTML content:
heading.textContent = 'New Title';
paragraph.innerHTML = '<strong>Bold text</strong>';
textContent is plain text — safe and fast. innerHTML parses the given string as HTML, which can create or replace nested elements.
Changing attributes and styles
You can read or set any attribute with getAttribute() and setAttribute(), or work directly with the dataset and classList APIs:
button.setAttribute('disabled', '');
button.classList.add('active');
button.dataset.state = 'clicked';
Style changes are done through the style property:
button.style.backgroundColor = 'black';
button.style.color = 'white';
It’s usually better to toggle CSS classes instead of editing inline styles — that keeps presentation and logic separate.
Removing elements
To remove elements, simply call remove() on the node:
newDiv.remove();Or clear an element’s children:
container.innerHTML = '';The bigger picture
Every change you make here updates the DOM tree in memory. The browser then re-renders only the parts that changed — an automatic, optimized process. This is the foundation for every UI interaction, from toggling menus to building full web apps.
In the next section, we’ll explore the relationship between attributes and properties — and why they aren’t always the same thing.
Working with Attributes and Properties
Every element in the DOM has two related layers of information — attributes and properties. They look similar, but they’re not the same.
Attributes: the HTML side
Attributes come from your HTML source. When the browser parses the HTML, it reads attributes and uses them to initialize the element’s state.
For example:
<input type="text" value="Hello" />Here, type and value are attributes — fixed pieces of data written in the markup. You can read or change them directly:
const input = document.querySelector('input');
console.log(input.getAttribute('value')); // "Hello"
input.setAttribute('value', 'Hi');
But note: changing the attribute doesn’t always change the live state of the element.
Properties: the live JavaScript side
When the DOM is created, the browser builds properties on the corresponding JavaScript object — often mirroring the same names. But properties reflect the current state, not the static HTML.
console.log(input.value); // "Hello"
input.value = 'Goodbye';
If you change input.value, the input field on the page updates instantly — but if you check the attribute again, it hasn’t changed:
console.log(input.getAttribute('value')); // still "Hello"That’s because the DOM treats attributes as initial values, and properties as the current live state.
A quick rule of thumb
- Attributes: what’s in the HTML.
- Properties: what’s in memory, live in the browser right now.
They often start the same, but can drift apart as the page changes.
Boolean attributes
Some attributes, like checked, disabled, or selected, are special. They don’t need a value — their presence alone means they’re true.
<input type="checkbox" checked>In the DOM:
input.hasAttribute('checked'); // true
input.checked; // true
If you toggle it with code:
input.checked = false;The box unchecks, but the checked attribute remains in the HTML. Again, the property (runtime state) has changed, not the source markup.
Data attributes
Custom data-* attributes let you store extra information directly on elements. The browser exposes them through the dataset object:
<button data-state="ready">Click me</button>const btn = document.querySelector('button');
console.log(btn.dataset.state); // "ready"
btn.dataset.state = 'clicked'; // Updates the data attributeThis is a clean way to attach metadata without polluting the DOM with extra IDs or custom properties.
Why the difference matters
Understanding attributes vs. properties helps you debug unexpected behavior. If you update a value and the UI doesn’t change, you might be editing the wrong one.
In short: use properties when you want to change what the user sees or interacts with. Use attributes when you need to modify the document’s structure or data.
Next, we’ll move from the structure itself to how the DOM responds — by listening to and reacting to events.
Understanding Events
So far we’ve looked at the DOM as a structure — a tree of elements that can be read or changed. But the DOM isn’t just static data. It also responds to what users do. That’s where events come in.
An event is a signal that something happened: a click, a key press, a form submission, or even the page finishing loading. Each event travels through the DOM as a structured object that your code can react to.
Listening for events
You can attach event listeners to any element using addEventListener():
const button = document.querySelector('button');
button.addEventListener('click', () => {
    console.log('Button clicked');
});
When the user clicks the button, the browser creates an event object and passes it to your function.
You can also remove a listener later:
function handleClick() {
    console.log('Clicked once');
}

button.addEventListener('click', handleClick);
button.removeEventListener('click', handleClick);
Common event types
There are hundreds of event types, but here are the main families:
| Category | Examples |
|---|---|
| Mouse | click, mousedown, mouseup, mousemove |
| Keyboard | keydown, keyup, keypress |
| Form | input, change, submit, focus |
| Window | resize, scroll, load, beforeunload |
| Touch | touchstart, touchmove, touchend |
Each event type carries its own properties. For instance, a mouse event includes coordinates (clientX, clientY), while a keyboard event includes the pressed key (event.key).
Inline vs. modern listeners
You might also see older HTML-style listeners like this:
<button onclick="alert('Hi!')">Click me</button>This works, but it mixes markup with logic and gives you less control. Modern JavaScript separates behavior from structure using addEventListener() instead — it’s cleaner, supports multiple listeners, and works for all event types.
The event object
Whenever your function runs, it receives an event object containing details about what happened:
button.addEventListener('click', (event) => {
    console.log(event.type);      // 'click'
    console.log(event.target);    // The <button> element
});
The target property tells you which element triggered the event. You can use this to handle multiple elements with one listener — something we’ll expand on when we talk about event propagation next.
Events are the DOM’s communication system. Every click, scroll, or key press becomes a structured signal that flows through the tree, giving your code a chance to respond.
How Events Propagate
When you click a button or press a key, the browser doesn’t just tell that one element — it notifies the entire DOM. The event moves through the document in stages. This process is called event propagation.
Every event passes through three main phases:
- Capture phase – the event travels down the DOM tree, starting from
window→document→<html>→<body>→ until it reaches the target element. - Target phase – the event reaches the element that was actually interacted with.
- Bubble phase – the event travels back up the tree, from the target element to the root again.
Here’s a simple visual:
window
 └─ document
     └─ body
         └─ div
             └─ button ← click target
When you click the button, the browser sends the event down the tree (capture), triggers the button’s own handler (target), and then bubbles it back up through its ancestors (bubble).
Observing propagation in action
Try this example in a console or local file:
<div id="outer">
    <button id="inner">Click me</button>
</div>

<script>
const outer = document.getElementById('outer');
const inner = document.getElementById('inner');

outer.addEventListener('click', () => console.log('Outer div clicked'));
inner.addEventListener('click', () => console.log('Button clicked'));
</script>
If you click the button, you’ll see both messages logged — first from the inner button, then the outer div. That’s bubbling in action: the event bubbles up to ancestors that also listen for it.
Capturing instead of bubbling
You can tell the browser to run a listener during the capture phase instead by passing a third argument:
outer.addEventListener('click', () => console.log('Captured on outer'), { capture: true });Now the outer handler runs before the button’s. Capture listeners are useful for intercepting events before they reach the target — for example, for validation or analytics.
Stopping the flow
Sometimes you don’t want an event to continue past a certain point. You can stop it with:
event.stopPropagation();This prevents the event from bubbling (or capturing) any further.
To block the element’s default browser behavior (like following a link or submitting a form), use:
event.preventDefault();Event delegation
Because events bubble, you don’t need to attach a listener to every single element. You can listen on a parent and check which element triggered it:
document.body.addEventListener('click', (e) => {
    if (e.target.matches('button')) {
        console.log('A button was clicked:', e.target.textContent);
    }
});
This pattern, called event delegation, is faster and more memory-efficient — perfect for lists, tables, or dynamically generated content.
Event propagation is one of the DOM’s most powerful features. It lets you build flexible interfaces with fewer listeners. Next, we’ll take this further and learn how to create custom events of your own.
Creating Your Own Events
Built‑in events cover clicks, keys, and forms — but real interfaces often need their own signals: “cart:added”, “modal:opened”, or “image:loaded”. The DOM supports this with custom events.
A custom event is just like a normal one: it has a type, it can carry data, and it can bubble through the DOM. You create it with CustomEvent and trigger it with dispatchEvent.
Defining and dispatching
// Create a detail payload to send with the event
const data = { productId: 42, qty: 1 };

// Configure behavior: make it bubble and be cancelable if you need
const evt = new CustomEvent('cart:add', {
    detail: data,
    bubbles: true,
    cancelable: true,
});

// Dispatch from a meaningful element (e.g., the button or the card)
const addButton = document.querySelector('[data-add-to-cart]');
addButton.dispatchEvent(evt);
Listening for your event
document.addEventListener('cart:add', (e) => {
    console.log('Adding to cart →', e.detail.productId, e.detail.qty);
});
e.detail is where your payload lives. Everything else works like any other DOM event — including propagation.
Canceling a custom event
If you set cancelable: true, listeners can veto work by calling preventDefault():
document.addEventListener('cart:add', (e) => {
    if (!userIsLoggedIn()) {
        e.preventDefault(); // Block default behavior
    }
});

const proceed = addButton.dispatchEvent(new CustomEvent('cart:add', {
    detail: { productId: 42, qty: 1 },
    bubbles: true,
    cancelable: true,
}));

if (!proceed) {
    // A listener called preventDefault()
    showLoginModal();
}
When you dispatch an event, dispatchEvent() returns false if any listener prevented the default.
Namespacing
Use clear names that group related events: modal:open, modal:close, gallery:select. Colons or dashes help avoid collisions and make handlers searchable.
Working with Shadow DOM
If you’re emitting events from inside a shadow root, set composed: true so the event can cross the shadow boundary:
this.dispatchEvent(new CustomEvent('rating:change', {
    detail: { value: 4 },
    bubbles: true,
    composed: true,
}));
Without composed: true, the event stays inside the shadow tree and won’t reach document‑level listeners.
Emitting from non‑DOM code
Need an event bus for plain JS code? You can dispatch from a lightweight element used only as a hub:
const bus = document.createElement('div');

bus.addEventListener('ping', (e) => console.log('pong', e.detail));

bus.dispatchEvent(new CustomEvent('ping', { detail: { t: Date.now() } }));
This keeps your messaging compatible with the DOM’s event system — no extra library required.
Custom events let you design clean boundaries. Components announce what happened; other parts decide what to do. Next up, we’ll look at when the DOM is ready to work with — the lifecycle events that frame page load and teardown.
DOM’s lifecycle
The DOM doesn’t appear all at once — it’s built progressively as the browser reads your HTML. That means scripts can sometimes run before the elements they’re trying to access even exist. Understanding the DOM’s lifecycle helps you know when your code can safely run.
The key lifecycle events
There are three main milestones to remember:
DOMContentLoaded– Fired when the browser has parsed all HTML and built the complete DOM tree. Stylesheets may still be loading, but all elements exist in memory and are accessible with JavaScript.load– Fired when the entire page (HTML, CSS, images, fonts, iframes) is fully loaded.beforeunload– Fired just before the user leaves or reloads the page. You can use it to save state or warn about unsaved work.
A simple pattern:
document.addEventListener('DOMContentLoaded', () => {
    console.log('DOM is ready');
});

window.addEventListener('load', () => {
    console.log('Everything loaded');
});

window.addEventListener('beforeunload', () => {
    console.log('Leaving the page');
});
DOMContentLoaded is the one you’ll use most often — it’s the signal that your elements are ready to manipulate.
Script placement matters
If you include scripts in the <head> without any attributes, the browser pauses HTML parsing to download and execute them. That can block the page from building.
To avoid this, modern HTML supports two attributes that control timing:
defer– The script is downloaded in parallel but runs after the DOM has been fully parsed.async– The script runs as soon as it’s ready, independent of parsing order.
Example:
<script src="app.js" defer></script>Using defer is the simplest way to ensure your DOM is ready before the script runs — no need for extra event listeners.
Late-loaded scripts
If your script is inserted dynamically after the page has loaded, you can assume the DOM already exists. In that case, your code can run immediately.
const script = document.createElement('script');
script.src = '/extra.js';
document.body.append(script);
Lifecycle and performance
Understanding the load sequence helps you write code that feels faster:
- Initialize lightweight interactions on
DOMContentLoaded. - Lazy-load images, fonts, or heavy resources after
load. - Save cleanup logic for
beforeunload.
These lifecycle hooks frame every page interaction. They tell you exactly when the DOM is stable, when assets are ready, and when it’s safe to change or unload them. Next, we’ll see what happens after those updates — how the browser reflows and repaints the page when the DOM changes.
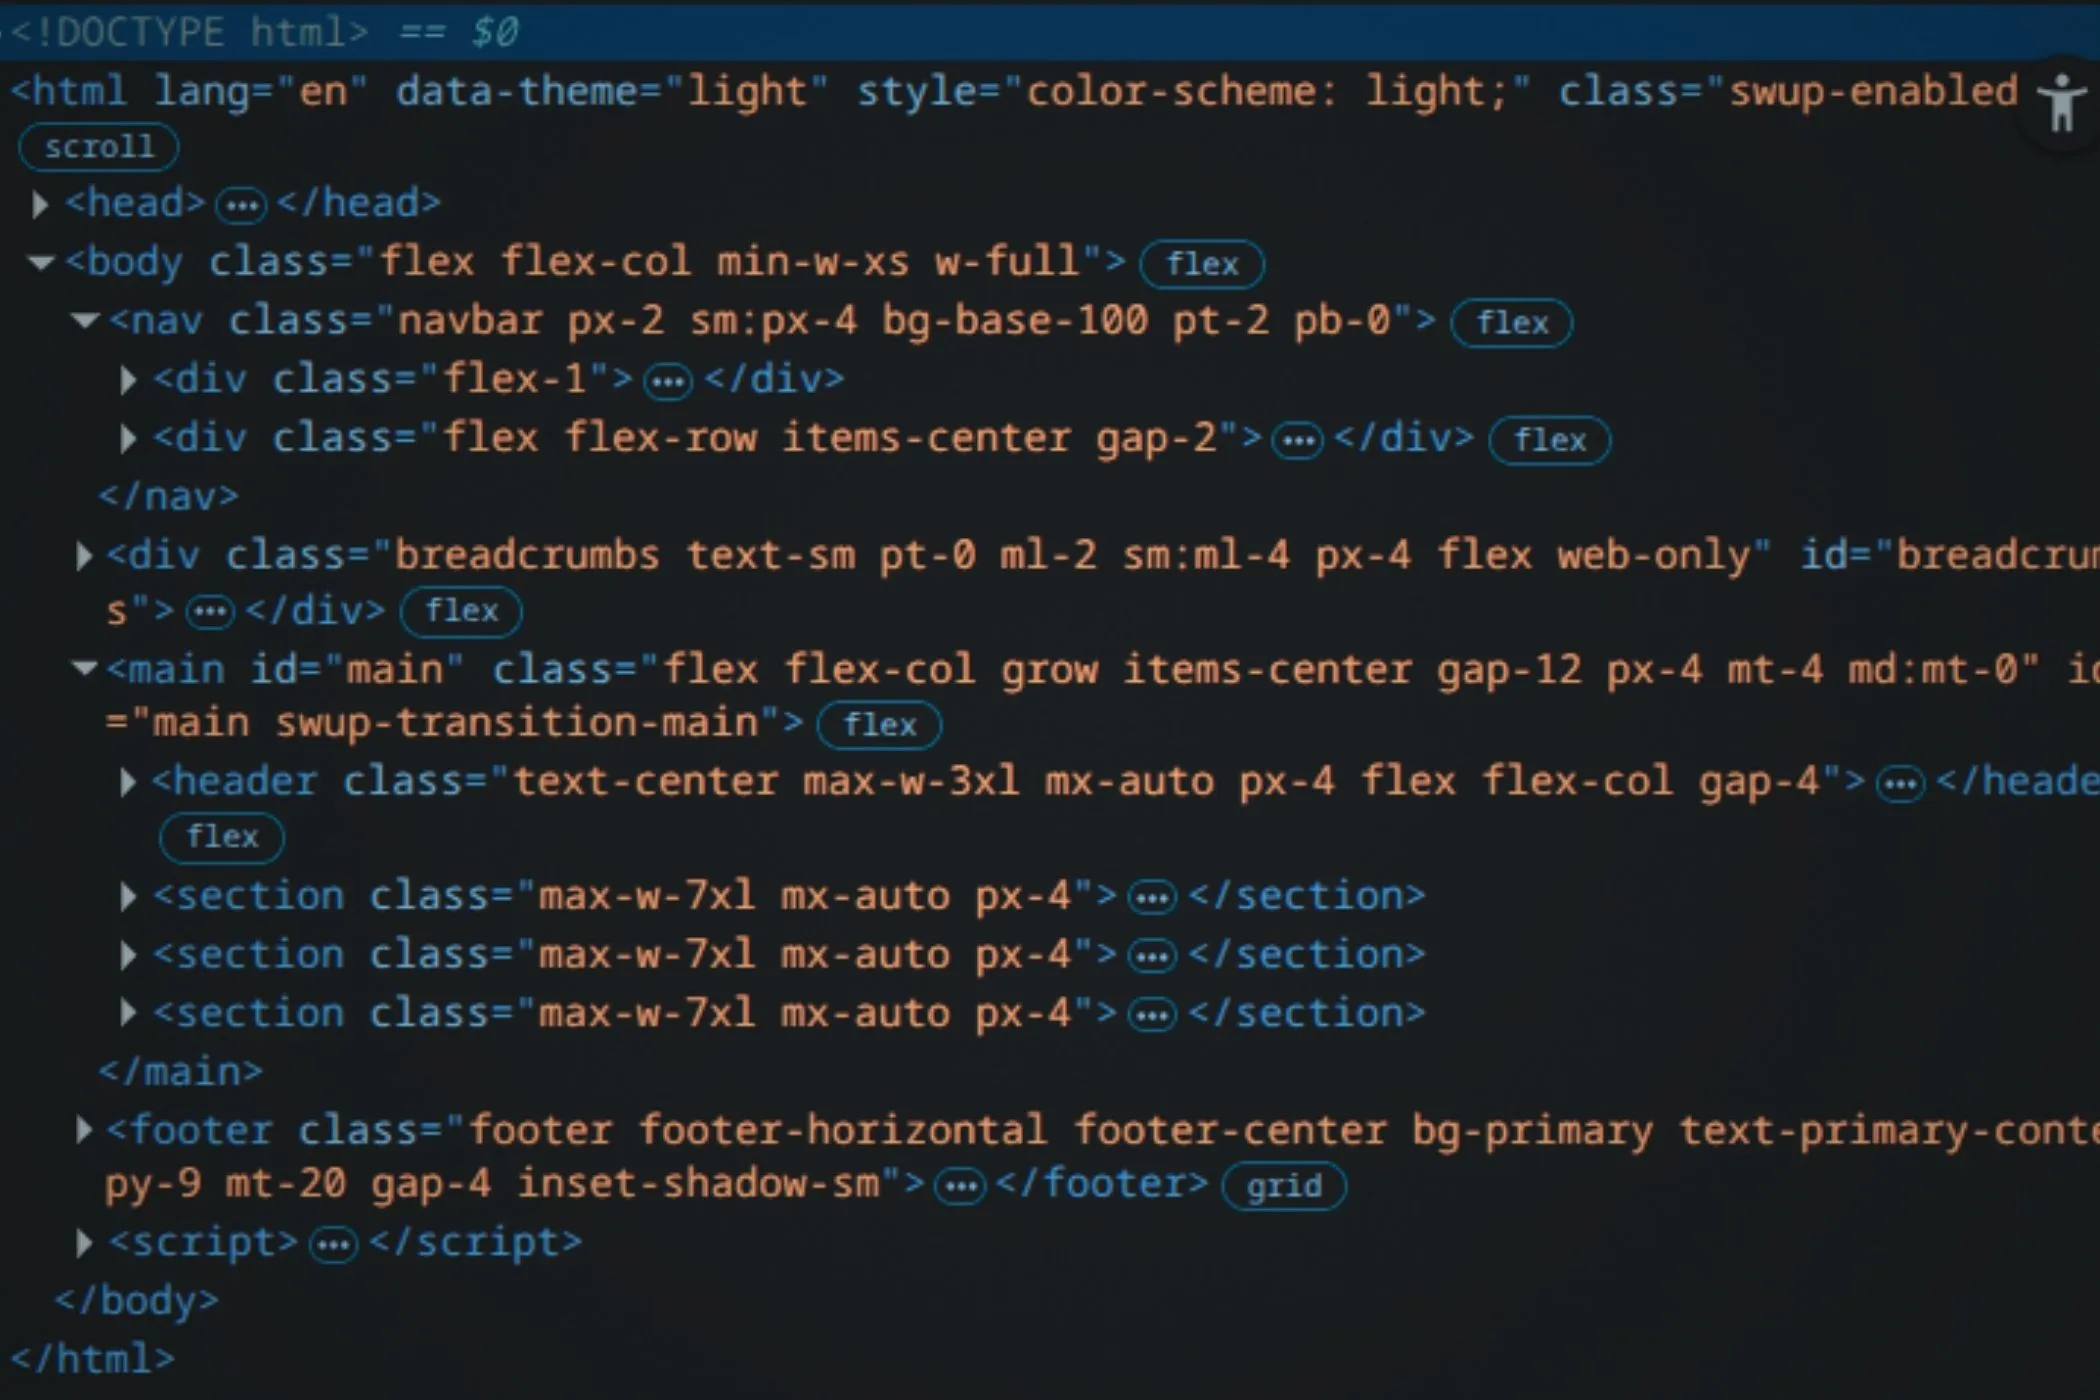
Inspecting the DOM in DevTools
Everything we’ve covered so far — elements, events, reflows — can be seen in real time through your browser’s Developer Tools. They’re the easiest way to explore how the DOM behaves under the hood.
Elements panel
Open DevTools (usually with F12 or Ctrl + Shift + I) and switch to the Elements tab. You’ll see the live DOM tree on the left and CSS rules on the right.
- Hover over nodes to highlight them on the page.
- Edit text or attributes directly to see instant changes.
- Drag elements to reorder them — the browser updates the DOM in memory as you do.
The Properties sub‑panel shows the actual JavaScript object behind the node, including inherited properties and event listeners.
Event listeners
Select any element and scroll to the Event Listeners section. You’ll see which handlers are attached and at what level (element, document, or window). You can expand each to view the listener code or pause execution when it fires — a great way to study bubbling in action.
Layout and performance
The Layout panel (or Box Model view) visualizes margins, borders, and padding, helping you understand reflows. In the Performance tab, record a short interaction and look for purple (recalculate style / layout) and green (paint) bars — those are your reflows and repaints.
Console shortcuts
You can jump between DevTools and the live page easily:
$0               // currently selected element
$1               // previously selected
inspect($0)      // jumps to it in Elements tab
copy($0)         // copies the node (great for pasting into console)
$$('img')        // NodeList of all images (querySelectorAll shortcut)
This lets you test small snippets right on the inspected node.
DevTools turns the DOM from an abstract model into something you can touch. Exploring it there helps connect theory to reality — every node, style, and event you’ve learned about here is visible and editable in real time.
Final Thoughts
The DOM is the browser’s living map of your page — the space where structure, style, and behavior meet. Once you see it that way, everything else in front‑end development starts to click.
You’ve seen how HTML becomes a tree of objects, how JavaScript can navigate and change that tree, and how the browser reacts with events, reflows, and repaints. You’ve also seen how DevTools gives you a window into all of it, showing the invisible system working in real time.
Every framework, every component library, and every reactive UI abstraction ultimately speaks to the DOM. It’s the foundation of web interactivity — a simple idea that has grown to support everything from static pages to complex apps.